Happy Perfect Picture Book Friday!
WHAT BAD LUCK! My scheduled blog post had to be pushed because the author’s book was pushed
And then a happy accident happened. If any of you ever watched the late great Bob Ross painting on TV, you’ll remember that he said there were no mistakes, only happy little accidents.
WHAT GOOD LUCK! I reached out to dear writing friend Suzy Leopold and she stepped up to the plate. Suzy put together an awesome Will Write for Cookies post, created a super journal-making craft, and is giving away a personalized journal! More than that, she shared the name of a picture book she uses in her school visits. I fell in love with it and plan to use it with students next year when my debut picture book launches.

SHOW ME A STORY: WRITING YOUR OWN PICTURE BOOKS
Written by Nancy Loewen
Illustrated by Christopher Lyles
Published by Picture Winow Books/Capstone (2009)
Ages: 7-9
Themes: creating stories, writing your own book
Synopsis:
From Amazon: Ready to build a picture book? First, you’ll need the right tools. Open this title in the Writer’s Toolbox series and discover plenty of tips and tools to get you started. Soon you’ll be writing and showing stories like a pro!
Why I like this book:
- Humorous story that serves as an example
- Great illustrations that will engage kids
- Breaks down the main elements of a picture book in simple terms
RELATED ACTIVITIES
Journal-Making by Suzy Leopold
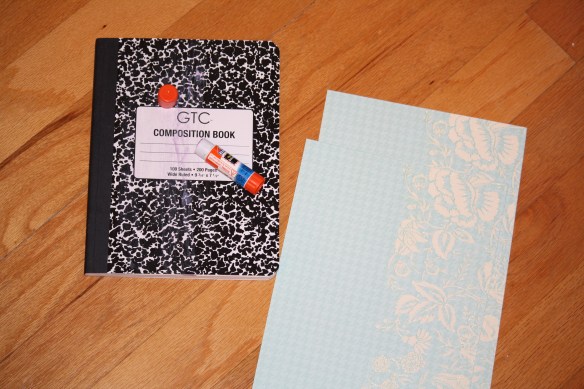
Materials Needed:
One composition notebook or student journal
Three pieces of 12 X 12 inch scrapbook paper
Glue stick
Hot glue gun
Scissors
Paper cutter (optional)
Ruler
Embellishments
Di cut letters or letter stickers
Ribbon or Rick Rack
Directions:

- Using three sheets of scrapbook paper, cut two pieces of scrapbook paper 8 X 12 inches.
- Apply a generous amount of glue to the journal, position the scrapbook paper and smooth out any bubbles.
- Wrap and fold the extended edges of the scrapbook paper, creating mitered corners and secure with a generous amount of glue.
- Cut two pieces of scrapbook paper 9 X 6 inches. Using a glue stick adhere to the inside covers of the journal.
 5. Open the journal to the middle section of the notebook that reveals the stitching. Hot glue two or three 14 inch pieces of ribbon on the top edge. Drape the pieces of ribbon across sections of the notebook to become a bookmark. Tie a knot at the bottom of each piece of ribbon.
6. Time to embellish your journal with scrapbook stickers and cutouts, etc. Use additional scraps of scrapbook paper. Recycle greeting cards. Use buttons and babbles. Be creative.

Suzy and I are both passionate about encouraging kids to read at home. She shared the info-graph below. I totally 100% agree with her…I used to hand out flyers to the students to bring home, asking parents to spend 15 minutes a day with their kids, reading, crafting, or cooking. But I like the 20 minutes better!

I hope you all have a wonderful weekend. For more picture book reviews, head on over to Susanna Hill’s website. But before you go, please leave a comment to be entered in the giveaway of a personalized journal made by the queen of craft herself…Suzy!
And don’t miss tomorrow’s Will Write for Cookies when Suzy shares her thoughts about using journals for this writing life and more.
